Braintree Integration Setup for Online Scheduling

Braintree Integration Setup for Online Scheduling
The Braintree integration allows online-booked appointments scheduled through the Red Spot Interactive Online Scheduling Tool to securely collect and process payments during the booking experience.
This integration supports both upfront payments and credit card holds, helping reduce no-shows and streamline revenue collection.
Prerequisites: Active account with Braintree
Feature Benefits
When Braintree is connected to your Red Spot Interactive Online Scheduling Tool, you gain:
-
Seamless online payments
Patients can securely submit payment information while booking appointments online. -
Procedure-based pricing
Automatically charge based on the specific service selected during scheduling. -
Provider-based payments
Support pricing that varies by provider when applicable. -
Credit card appointment holds
Collect card information to reserve appointments without charging immediately. -
Reduced no-shows and cancellations
Financial commitment at booking encourages patients to keep their appointments. -
Secure, PCI-compliant processing
All payment data is handled through Braintree’s secure infrastructure.
Option 1: Share API Credentials (Recommended)
Follow the steps below to gather your Braintree API credentials and share them with RSI.
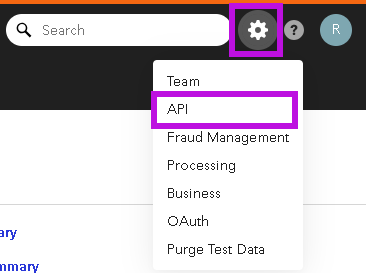
Step 1: Open Your Braintree API Settings
- Log in to your Braintree account.
-
Go to Settings → API (top right of the dashboard).
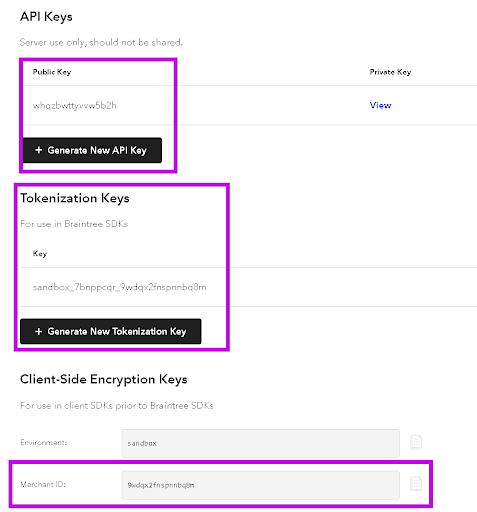
Step 2: Copy the Required Credentials
From the API settings page, copy the following values:
- Public Key — copy directly from the page
- Tokenization Key — copy directly from the page
- Merchant ID — copy directly from the page
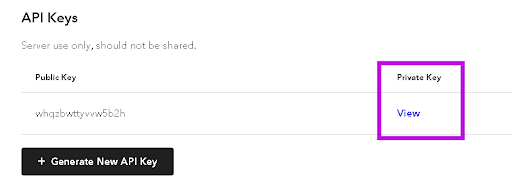
- Private Key — click View next to the Public Key to reveal and copy
Note: If any keys don’t exist yet, use the Generate buttons to create them.

Step 3: Send Credentials Securely
Send the four items below to your RSI project manager:
- Merchant ID
- Private Key
- Public Key
- Tokenization Key
⚠️ Important: These credentials contain sensitive information. Please send them using the secure method provided by your RSI project manager.
Option 2: Grant RSI Temporary Access
If you prefer not to share credentials directly, you can grant RSI access to retrieve the required information.
Step 1: Create an RSI User Account
In your Braintree account, create a new user using the email address provided by your RSI project manager (also included in your onboarding documentation).
Step 2: Set Permissions
Configure the user with the following permissions:
- Allow API Access: Enabled
- Role: Account Admin
Step 3: Notify RSI
Let your RSI project manager know once access has been granted so they can collect the credentials.
Note: RSI will remove this access once the integration is complete.

What This Integration Enables
Once configured, your Braintree integration can support:
- Per-procedure payments — collect payment for specific services at booking
- Per-provider payments — process payments based on the selected provider
- Appointment holds — require a credit card to reserve appointment slots
Next Steps
After you either share credentials or grant temporary access, your RSI project manager will complete the configuration and let you know when testing can begin.