Education Library
Smart Waitlist Configuration Guide
How to Get Started
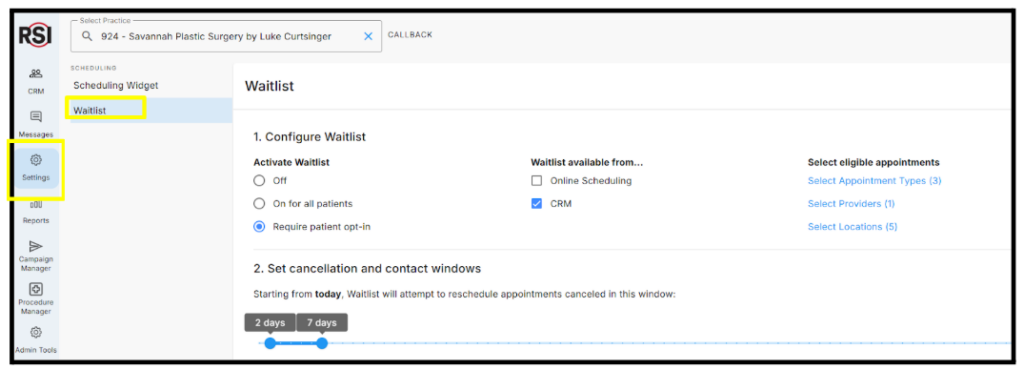
Step 1: Access Waitlist Settings
- Log into the CRM
- Select Settings
- Select Waitlist
Configure Waitlist Settings
You can automatically opt all patients into your Smart Waitlist options, or make this a self-selected opt-in at the point of scheduling.Activate Waitlist
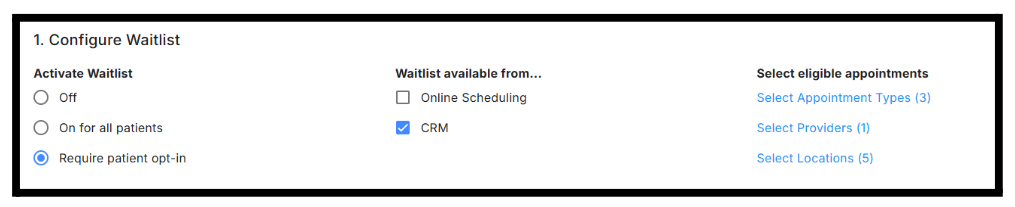 Off: The waitlist feature is disabled for all patients and internal users of the CRM.
On for All Patients: The waitlist feature is enabled for all patients by default. Patients who have appointments that meet your criteria of Appointment Type, Location and Provider will automatically enroll in the waitlist and be notified if an earlier appointment becomes available.
Require Patient Opt-in: Patients are given the option to join the waitlist when scheduling an appointment that meets selected criteria.
Off: The waitlist feature is disabled for all patients and internal users of the CRM.
On for All Patients: The waitlist feature is enabled for all patients by default. Patients who have appointments that meet your criteria of Appointment Type, Location and Provider will automatically enroll in the waitlist and be notified if an earlier appointment becomes available.
Require Patient Opt-in: Patients are given the option to join the waitlist when scheduling an appointment that meets selected criteria.
Waitlist Available From
Select where you would like the waitlist to be available: Online Scheduling: If your practice utilizes the RSI online scheduling feature, patients who schedule an appointment that meets allowed criteria of appointment type, location and provider will be given an option to be added to the waitlist. CRM: When scheduling an appointment within the CRM, the User will have the option to add the patient to the waitlist if the appointment meets the set criteria.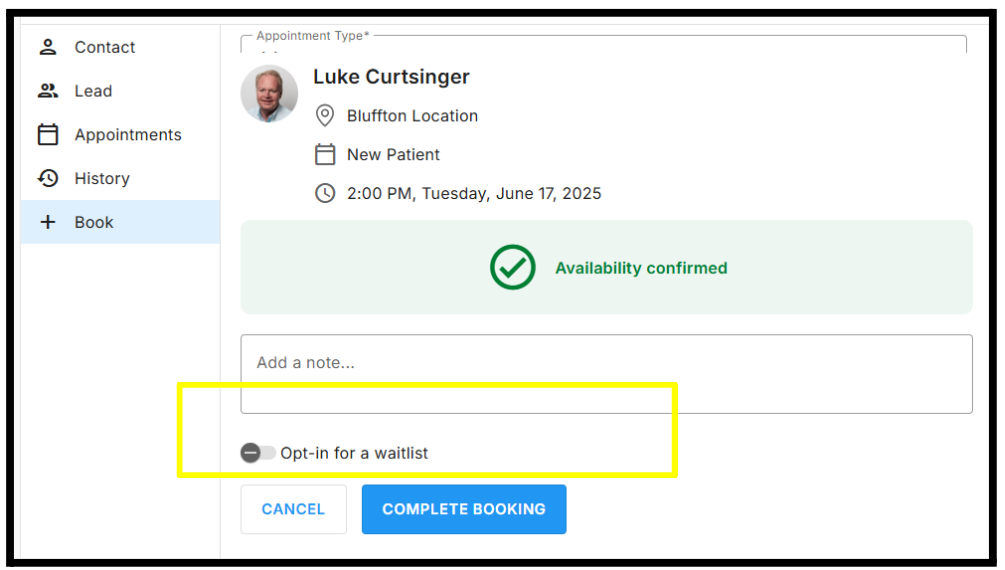
Eligible Appointment Types
Smart Waitlist allows you to control which appointments are eligible. You can allow patients to be added to the waitlist based on your chosen criteria:- Select Appointment Types
- Select Providers
- Select Locations
Click on each of these criteria to select your combinations, then hit Save.
Step 2: Set Cancellation and Contact Windows
Customize the timeframe in which the waitlist will search for available appointments.
Cancellation Window
How far in advance will Waitlist try to fill canceled appointments?- Starting from today’s date, Waitlist will attempt to reschedule any appointments that are canceled within the next _____ to _____ days
- Appointments canceled beyond this window won’t trigger the waitlist system
Future Appointment Window
Which patients will be contacted when a slot opens up?- Waitlist contacts patients whose original appointments fall _____ to _____ days after the canceled appointment date
- This ensures patients are moved to earlier slots, not later ones
How It Works: Step-by-Step Example
Using example settings:- Cancellation window = 2-7 days
- Future Appointment Window = 10-21 days
- Cancellation Check: Since June 8th falls within 2 days of today (within our example 2-7 day cancellation window), Waitlist activates to fill this slot
- Patient Selection: The system identifies patients with appointments between June 18-29, 2025 (10-21 days after the canceled June 8th appointment, using our example contact window)
- Outreach Begins: Starting immediately, Waitlist contacts these eligible patients to offer them John’s June 8th time slot
Step 3: Set Messaging Preferences
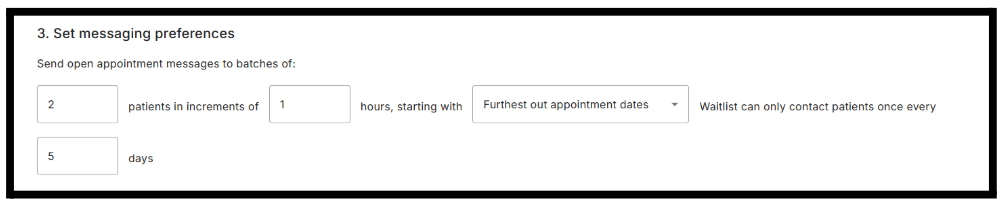
Batch Size and Timing
- Send open appointment messages to batches of ____ patients at a time
- Wait ____ hours between each batch
- This prevents overwhelming your phone lines and allows time to assess response before contacting additional patients
Patient Priority Order
Choose your preferred contact sequence: Furthest out appointment dates: Contact patients with appointments farthest in the future first (gives them the most schedule flexibility) Nearest out appointment dates: Contact patients with appointments closest to today first (may create more urgency to respond)Contact Frequency Limits
- Waitlist can only contact the same patient once every ____ days
- This prevents patients from receiving excessive messages and maintains a professional communication standard
How Messaging Works: Example
Using example settings: 5 patients per batch, 2-hour intervals, furthest appointments first, 7-day contact limit When John’s June 8th appointment becomes available:- First Batch: Waitlist contacts 5 patients with the furthest-out appointments (those scheduled for late June)
- Wait Period: System waits 2 hours to see if anyone responds
- Next Batch: If the slot remains unfilled, contact the next 5 eligible patients
- Repeat: Continue until the appointment is filled or all eligible patients have been contacted
- Protection: Any patient contacted today won’t receive another waitlist message for 7 days
Step 4: Messaging Preferences
Configure how and when appointment offers are sent to patients:Batch Offer Settings
- Determine how many patients are offered the open appointment slot at one time
- Set the time interval before the appointment is offered to the next set of eligible patients
Offer Prioritization
Choose whether to offer open appointments first to patients with the closest upcoming appointments or to those with the furthest appointments in the future.Repeat Offer Frequency
Define how often the waitlist feature will offer the same patient another appointment time if they do not accept a previous offer.Step 5: Customizing Patient Notifications
Personalize the messaging sent to patients when a sooner appointment becomes available: Text Message: Customize the SMS notification content to alert patients of an earlier available appointment. Email Message: Modify the email notification text to inform patients of the opportunity to reschedule for a sooner date.