JavaScript Plugin
Requirements
Obtain access to the website’s source code. This should be done by your web developer. The plugin also has a simple configuration that could be used with CMS form builder plugins.
Please note the following forms are not compatible with our Javascript. If you are using any of the following forms, you must switch to another form plugin or use the Zapier or Webhook integration methods.
- Jot Forms
- Gravity Forms (Version 2.9 and higher)
Installation
Step 1
Integrate the plugin’s URL directly into markup by adding a new script tag inside the website HTML code.
<script type="text/javascript" src="https://cdn.redspotinteractive.com/lead-form/bundle-v2.js" defer></script>
Step 2
Create additional CSS classes with hidden inputs to the Lead Form(s) code. Add rsi-lead-form CSS class to the form.
<form class="rsi-lead-form"></form>
Step 3
Add two input fields of type hidden to identify the Client and Campaign to which the form is connected to.
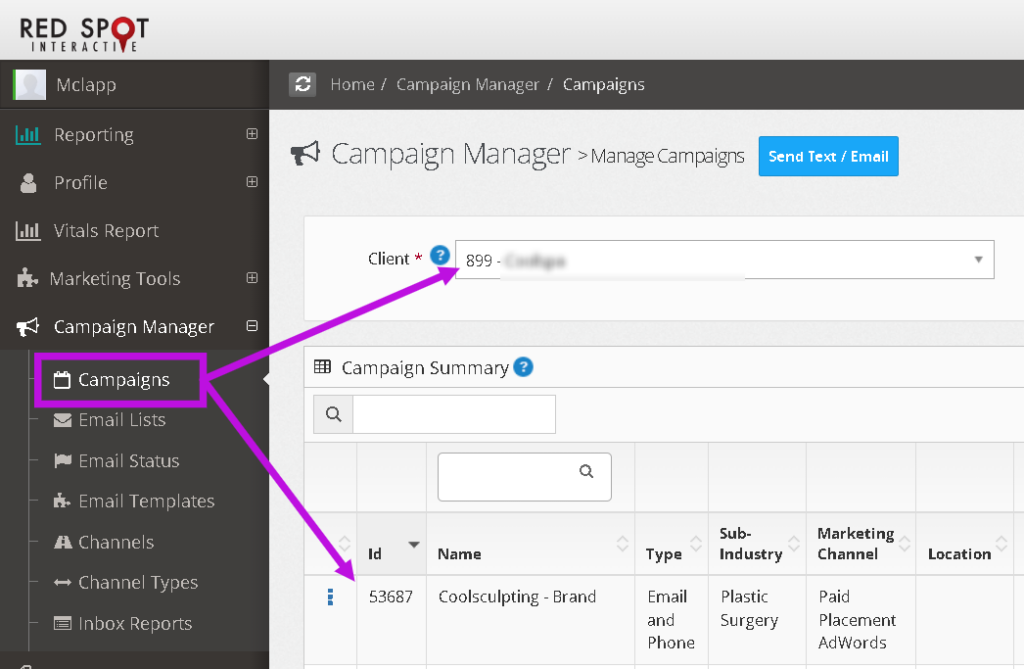
To locate the Client ID and Campaign ID(s) in your account go to Campaigns. Your Client ID is located at the top of the page next to your practice name. The Campaign IDs are located next to each Campaign Name.
<input type="hidden" id="rsi-client" value="RSI_CLIENT_ID" />
<input type="hidden" id="rsi-campaign" value="RSI_CAMPAIGN_ID" />
OR
<input type="hidden" class="rsi-client" value="RSI_CLIENT_ID" />
<input type="hidden" class="rsi-campaign" value="RSI_CAMPAIGN_ID" />
OR
<div class="rsi-client">
    <input type="hidden" value="RSI_CLIENT_ID" />
</div>
<div class="rsi-campaign">
    <input type="hidden" value="RSI_CAMPAIGN_ID" />
</div>- rsi-client value should contain an ID or CSS class on input or CSS on its container of the Client in RSI system e.g. value=”300”, and allows to map Client lead request data.
- rsi-campaign (optional) value should contain an ID or CSS class on input or CSS on its container of the Client’s Campaign e.g. value=”12380”, and allows to bind a default Campaign which be used to bind Lead from the JS Plugin. All leads coming through the JS plugin will be bound to this default Campaign (if there are no UTM tags).
- Example of the configuration for the above looks like this:
<form class="rsi-lead-form">
    <input type="hidden" id="rsi-client" value="300" />
    <input type="hidden" id="rsi-campaign" value="12380" />
</form>
OR
<form class="rsi-lead-form">
    <input type="hidden" class="rsi-client" value="300" />
    <input type="hidden" class="rsi-campaign" value="12380" />
</form>
OR
<form class="rsi-lead-form">
    <div class="rsi-client">
        <input type="hidden" value="300" />
    </div>
    <div class="rsi-campaign">
        <input type="hidden" value="12380" />
    </div>
</form>
Step 4
Add RSI CSS classes to Form inputs or their container elements (names are self-descriptive). NOTE – the minimum required mappings for our plugin to capture leads are FirstName+LastName OR FullName and Email. Without this information, we can’t create a lead profile. All other properties are optional. Currently, we support:
rsi-first-name
<input type="text" class="rsi-first-name" />
rsi-last-name
<input type="text" class="rsi-last-name" />
rsi-full-name
<input type="text" class="rsi-full-name" />
rsi-phone
RSI will only accept 10-digit phone number formats. Country codes must be removed otherwise the last digits of the phone number will be cut off.
<input type="text" class="rsi-phone" />
rsi-email
<input type="text" class="rsi-email" />
rsi-zip
This will map to the postal code in their home address.
<input type="text" class="rsi-zip" />
rsi-location
This should always be a dropdown answer type to maintain consistent data. When a lead is inserted we can map this to the exact location record in their PM system as long as the location name on the form is an exact match to the location name in the PM System. (For example, if it is listed as WPB – AC in the PM system but the form selection says West Palm Beach Office, it will not map.)
<input type="text" class="rsi-location" />
OR
<select class="rsi-location"></select>
rsi-provider
This should always be a dropdown answer type to maintain consistent data. When a lead is inserted we can map this to the exact provider record in their PM system as long as the first and last name are an exact match to how it is written in the PM. (For example, if they are listed as William Smith in the PM system but the form selection says Dr. Bill Smith, it will not map.)
<input type="text" class="rsi-provider" />
OR
<select class="rsi-provider"></select>
rsi-procedure
This should always be a dropdown answer type to maintain consistent data.
<input type="text" class="rsi-procedure" />
OR
<select class="rsi-procedure"></select>
rsi-message
Free form input for additional information from Lead
<input type="text" class="rsi-message" />
OR
<textarea type="text" class="rsi-message"></textarea>
rsi-dob
<input type="text" class="rsi-dob" />
rsi-insurance
We try to map the insurance provided with the items available in the client insurance list. If we are not able to map insurance, it will be added to the Notes field in the lead profile.
<input type="text" class="rsi-insurance" />
OR
<select class="rsi-insurance"></select>
rsi-form-name
This is an optional binding that allows you to specify the lead form on a website if you are sending multiple forms to the same RSI campaign. E.g. footer form, header form etc.
<input type="hidden" class="rsi-form-name" value="Footer Form" />
EXAMPLE
You can add RSI CSS classes to inputs or you could place them in the input containers like this:
<div class="rsi-first-name">
	<input type="text" />
</div>
This was added because in some CMS plugins adding CSS classes to inputs is not easy.
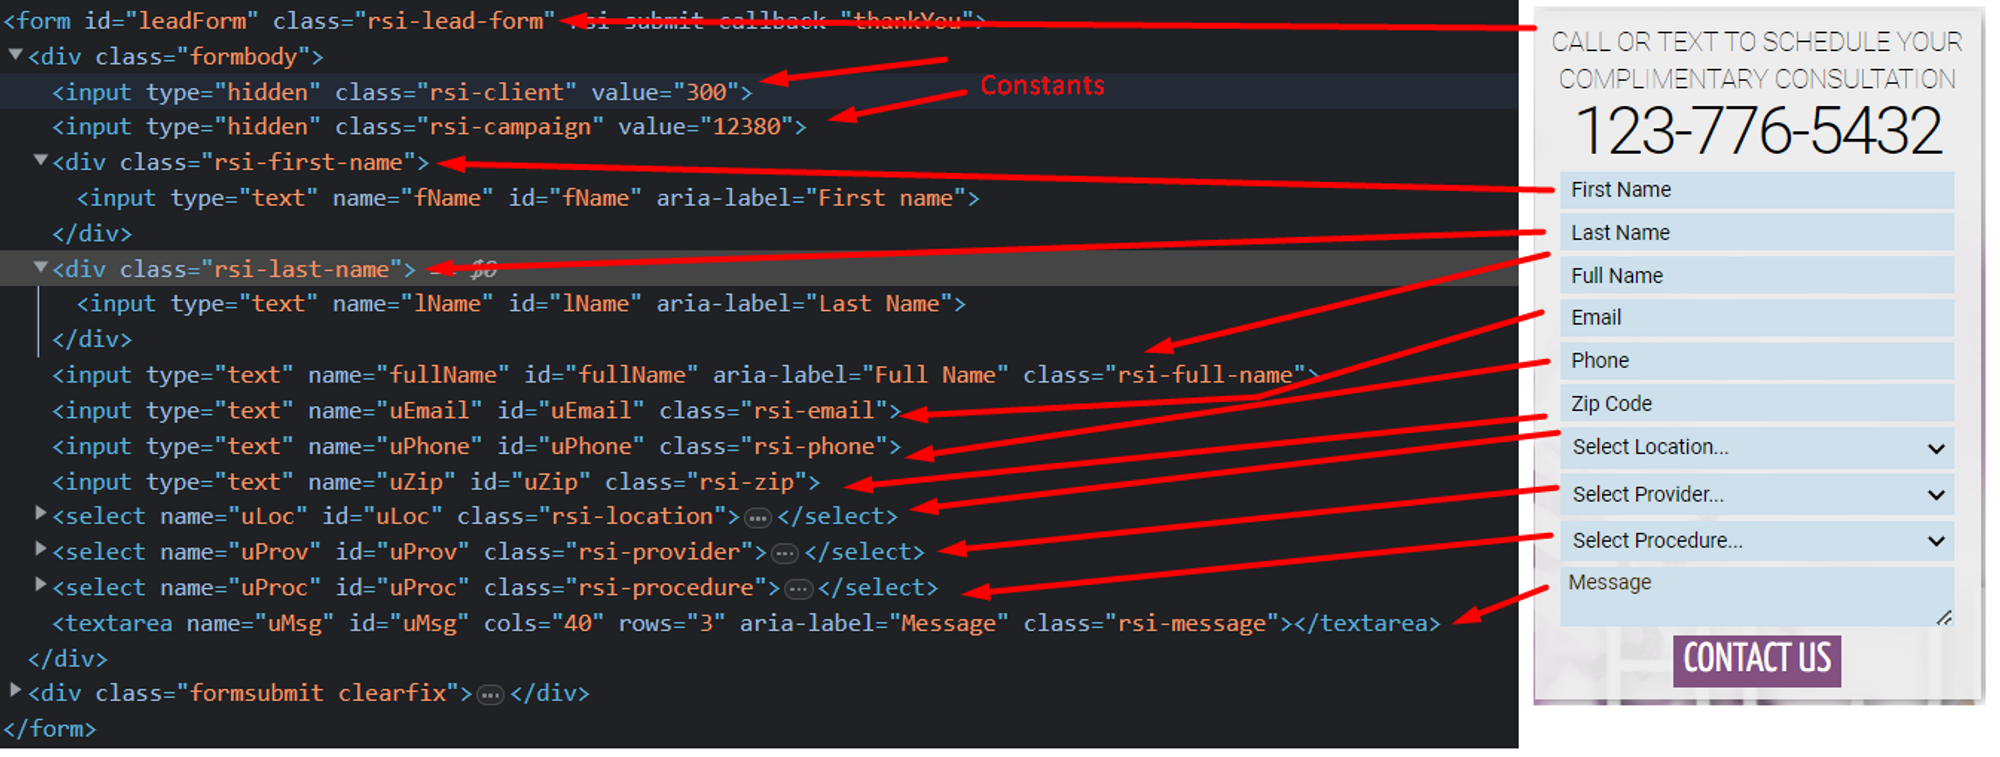
Here is an example. On the right side you can see the Lead Form itself, and on the left its HTML code with RSI data bindings.
To check whether RSI plugin is configured correctly, open developer console. When mappings are correct you will see comments like the below. Otherwise, you will see warnings starting from the [RSI] prefix.

Step 5
To ensure the form is submitted via mobile, add a form action and method:
action=”/thankyou” method=”POST”
Configuration for CMS plugins
If the website uses a CMS (i.e. WordPress) and you use plugins to build your forms you can configure your forms to RSI using CSS classes and input fields.
EXAMPLE: WordPress Contact Form 7
For instance, if the website is hosted in WordPress, and uses Contact Form 7 plugins, the RSI configuration would look like this:

To add a CSS class to the form you need to use the html_class attribute:
html_class=”rsi-lead-form”